
How to Screen Record on iPhone
Apple includes a powerful, built‑in tool that lets you capture everything happening on your iPhone display. Whether you want to create a tutorial, save a video call, or share a tricky setting with a friend, the iPhone built‑in screen recorder makes the process effortless. In this guide you will learn how to screen record on iPhone, add the screen‑recording shortcut to Control Center, record with or without audio, trim and edit your videos, and fix the most common issues.
What You Need Before You Start
- iPhone with iOS 11 or later – Screen recording was introduced in iOS 11, but later versions add more features.
- Sufficient free storage – Each recording can take up hundreds of MB; check Settings → General → iPhone Storage.
- No third‑party apps required – Everything is built directly into iOS.
If you are using iOS 18 or later, you will also benefit from stereo audio recording, HDR video support, and a live camera overlay (picture‑in‑picture).
How to Add Screen Recording to Control Center
The screen‑recording button is not visible in Control Center by default. You need to add it once:
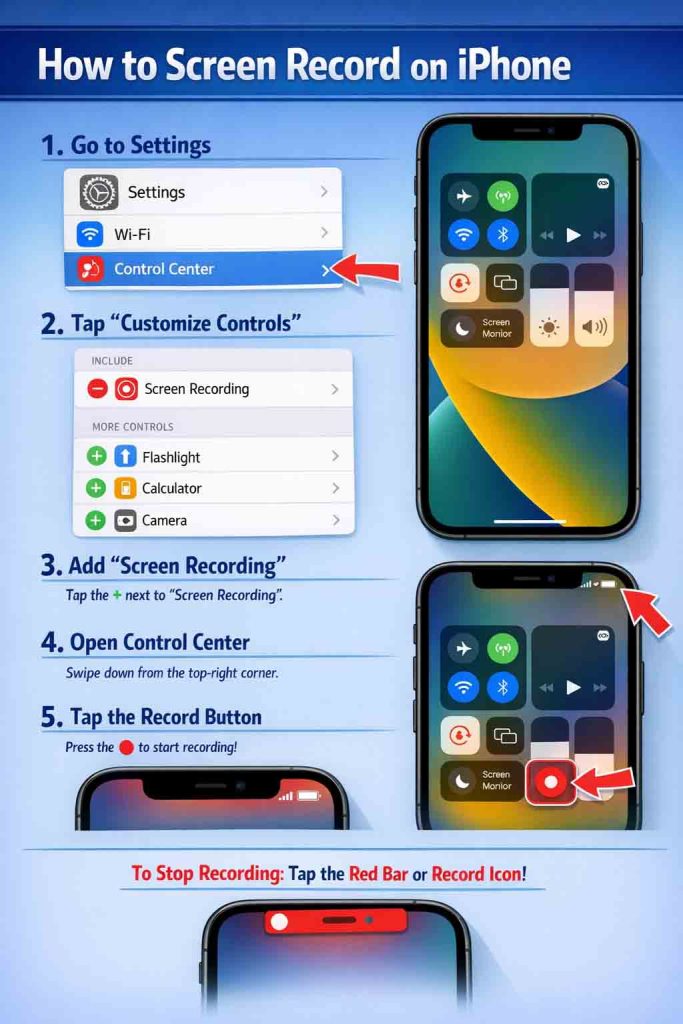
- Open Settings → Control Center.
- Scroll down to More Controls and look for Screen Recording.
- Tap the green + (plus) icon next to it.
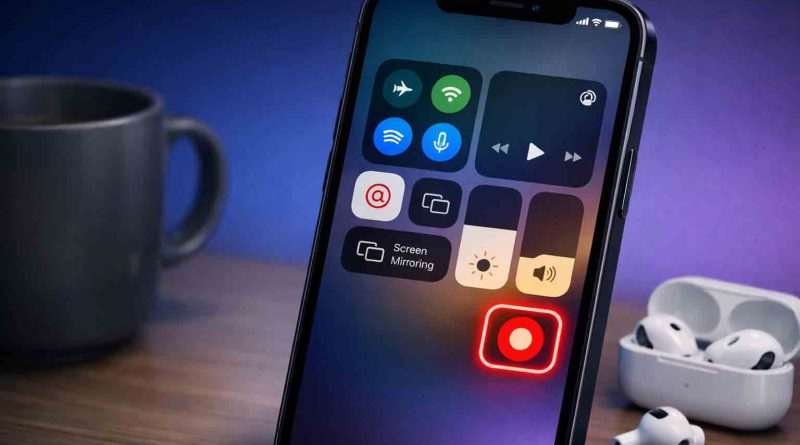
The button will immediately appear in your Included Controls section. You can now open Control Center (swipe down from the top‑right corner on Face‑ID iPhones, or swipe up from the bottom on Touch‑ID models) and find the Screen Recording icon – a solid circle inside a larger ring.
Step‑by‑Step: How to Screen Record on iPhone
Once the button is in Control Center, follow these simple steps to record your screen.
1. Open Control Center and Tap the Record Button
Swipe down from the top‑right corner (or up from the bottom on older iPhones) and tap the Screen Recording icon. A three‑second countdown appears, then the recording starts. You can close Control Center and continue using your iPhone normally – everything on the screen will be captured.
2. Stop the Recording
When you are finished, do one of the following:
- Tap the red status bar at the top of your screen and choose Stop, or
- Open Control Center again and tap the now‑red Screen Recording button.
Your video is automatically saved to the Photos app.
3. Find and Watch Your Recording
Open Photos and go to your Library. Screen recordings are saved like any other video. You can also find them in the Media Types → Screen Recordings album for easy access.
How to Record iPhone Screen with Audio (Microphone)
Sometimes you want to narrate what you are doing or capture a conversation. The iPhone built‑in screen recorder can record sound from your microphone, but you must enable it before starting:
- Open Control Center.
- Press and hold the Screen Recording button (don’t just tap it).
- In the pop‑up menu, tap the Microphone icon so it turns red (on).
- Tap Start Recording – the countdown begins and your voice will be captured along with the screen.
Important: This records external sound (your voice, ambient noise). It does not record the device’s internal audio (like music playing from Apple Music) when the microphone is on. To capture internal audio only, leave the microphone off.
For the best results, use Do Not Disturb mode before recording so no unexpected notifications or calls interrupt your video.
New in iOS 18.3: Stereo Audio, HDR, and Live Camera Overlay
If you are running iOS 18.3 or later, the screen‑recording tool has received three major improvements:
- Stereo audio – Your iPhone uses multiple microphones to create a more immersive sound experience.
- HDR video – High Dynamic Range content is now recorded without being dimmed, preserving vibrant colors.
- Live camera overlay – You can show your face in a picture‑in‑picture window while recording the screen. Tap the Camera button in the Screen Recording menu to enable this.
These features make your recordings look and sound much more professional without any extra hardware or software.
How to Edit Screen Recording on iPhone (Trim, Crop, Adjust)
After you finish a recording, you may want to remove extra seconds at the beginning or end. You can trim screen recording on iPhone directly in the Photos app without any third‑party tools:
- Open Photos and tap the screen‑recording video.
- Tap Edit in the top‑right corner.
- Drag the yellow sliders at either end of the timeline to set a new start and end point.
- Tap Done, then choose Save Video to keep only the trimmed portion, or Save as New Clip to keep the original.
For more advanced editing (adding text, arrows, background music, or transitions), you can use free or paid video editors from the App Store.
Also Read: How to Make an Apple Genius Bar Appointment
Troubleshooting: Why Is My iPhone Screen Recording Not Working?
Occasionally you may run into issues. Here are the most common problems and their fixes.
❌ The Screen Recording Button Is Missing
Go to Settings → Control Center and add Screen Recording using the green + button. If it still doesn’t appear, restart your iPhone.
❌ Recording Starts but Stops Immediately or Saves Nothing
- Check storage – If your iPhone is full, the recording cannot save. Free up space in Settings → General → iPhone Storage.
- Disable Low Power Mode – This mode can interfere with screen recording. Go to Settings → Battery and turn off Low Power Mode.
- Restart your iPhone – A simple restart often clears temporary glitches.
❌ No Sound in the Recording
- If you want external audio (your voice), you must press and hold the Screen Recording button and enable the Microphone before starting.
- If you want internal audio (music from apps), leave the microphone off. Note that some apps (like Netflix, Hulu, or banking apps) block screen recording entirely due to copyright or privacy restrictions.
❌ Screen Recording Is Grayed Out or Restricted
- Go to Settings → Screen Time → Content & Privacy Restrictions and make sure Screen Recording is allowed.
- If you are on a managed device (work or school iPhone), your organization may have disabled the feature.
❌ Recordings Are Choppy or Low Quality
- Close background apps by swiping up from the bottom and flicking them away.
- Make sure your iPhone is not overheating – give it a few minutes to cool down.
- Update to the latest iOS version (Settings → General → Software Update).
Final Tips for Better Screen Recordings
- Enable Do Not Disturb before you start – this prevents texts and calls from appearing in your video.
- Clean your screen – smudges won’t appear in the recording, but a clean screen helps you see better while working.
- Use a tripod or stand if you need to keep the iPhone steady while recording.
- Practice first – do a short test recording to ensure your audio levels and framing look right.
Conclusion
You do not need any special apps or equipment to capture your iPhone screen. By learning how to screen record on iPhone, you can quickly create videos for work, school, gaming, or helping friends and family. The built‑in tool is free, easy to use, and works on every iPhone running iOS 11 or newer. Just remember to add screen recording to Control Center first, choose whether you want microphone audio, and trim the final video in the Photos app.
For more official information, visit Apple’s guide to screen recording and Apple’s video‑trimming instructions. You can also explore ZDNet’s step‑by‑step tutorial and PCMag’s tips for recording with sound for additional insights.
If you run into trouble, the iDownloadBlog article on iOS 18.3 improvements explains the latest features in detail.
Now you learned how to screen record on iPhone – it takes only a few taps, and you will wonder why you did not start using it sooner.